Multimedia Xpert

Converting Videos


Share


Overview
Conversion
Shifting Audio
Concatenating
Splitting
Burning Text or Image
Scanning for Defects
Process Queue
Output Specifications
Overwrite Management
Format Info
Settings
True GUI for ffmpeg
Explorer Integration
General Features
Download
Buy License
Help
3rd Party Reviews


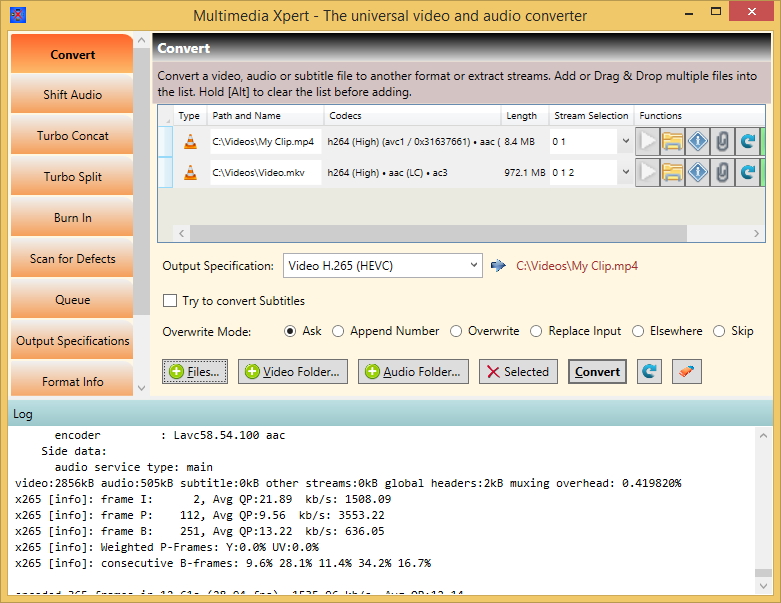
Multimedia Xpert can convert between a massive number of video formats. It can be viewed as the universal video converter. If your player can't play a format, no problem, Multimedia Xpert will fix it.


At this time it supports

  • 300 input file formats
  • 161 output file formats
  • 244 video codecs
  • 178 audio codecs
  • 191 pixel formats
  • 26 subtitle formats

and the numbers are constantly growing. What is most important: The algorithms work reliably! Here are some frequently used conversions:

  • Conversion of H.265 to H.264 (HEVC to H.264 resp. x265 to x264)
  • Video to HEVC resp. H.265 resp. x.265
  • Conversion of MKV to MPEG-4 (Matroska)
  • Conversion of AVI to MPEG-4
  • Conversion of WMV (Windows Media Video) to MPEG-4
  • Conversion of FLV to MPEG-4 (Adobe Flash)
  • Conversion of MP4 to TS (Dreambox resp. VU+ MPEG-2 Transport Stream)
  • 10-bit or 12-bit color to 8-bit color conversion (eg. Amazon Video)
  • Conversion of Flac to MP3 (Lossless audio coding)
  • Conversion of AAC to MP3 (Advanced Audio Coding)
  • Conversion of ALAC to M4A (Apple Lossless)
  • Conversion of EAC to AAC (Exact Audio Copy)
  • Conversion of M4A to MP3 (MP4 AAC, ie. produced by the Android app 'Voice Recorder')
  • ASS subtitles (Advanced Substation Alpha) to SRT (SubRip)

Multimedia Xpert is near to converting anything to anything correctly. It can be extremely frustrating if you just get a black screen or an error message after one long hour of processing. Also, not everybody would like to install one program for each single format whereas there is one program than can do it all, and with high reliability.

Mass conversion

Multimedia Xpert is specifically designed to convert many files in a single pass without user input. As a specialty, it can also convert files directly in place. More info about that in overwrite management.

Making file sizes smaller

A conversion can be used for making file sizes smaller to bring down upload/download times. To achieve this you can reduce the bit rate, frame rate or image size of the video.

Repairing partially damaged files

Sometimes media files get damaged during the transfer or transport by USB stick or other medium. If the damages are not too big there is a good chance that a file can be repaired. Just convert it to the same format. The conversion algorithms are quite tolerant and will recover whatever possible. You will end up with a file that has some parts skipped but at least it's a fully valid one which can be played by every media player without any problems. Multimedia Xpert simplifies such conversions by a built-in Inplace Replacement method that doesn't require entering a new name.

Extracting audio

This processing page can be used to extract audio tracks of a video into an audio file. This can be useful especially for music videos. It's also used by many people to convert lectures in front of an audience from video to audio. In many cases there is very little to see and they are therefore very good suited as podcasts during sports activities or travel. By making use of the extraction range in the output specification it's also possible to extract just a part, eg. a nice song in the credits of a movie.

For this to do you switch to the Output Specification page and choose resp. create a specification of type 'Audio'.

Selecting and/or adding streams

In the past streams were called "tracks", but today the word stream is more common. During the conversion, you have the option to pick some streams/tracks from the input and at the same time add new ones (). To just add some streams to the video without converting please read here.

Extracting Subtitle Streams

If your input file contains subtitles streams you can extract all of them with a single click. Each subtitle stream will be put in a single file beside the input file. To be able to do this you wil first have to select an output specification of type 'Subtitle' and enter your desired subtitle format there. Then you will get a new button 'Extract Subtitles' in the conversion window.

Viewing the converted media

After a conversion the green buttons in the grid will perform some functions on the converted output. We recommend VideoLAN Client (VLC) as a player because it can play nearly any format and is a free and open community solution. Here some tips for VLC:

  • You can stop the opening of its main window on a unsuitable location with an unfitting size by unchecking the checkbox "Resize interface to video size" in the section Interface.

  • You can set your preferred subtitle language priority in the Preferences dialog in the section Subtitles. The languages are specified by a list of three letter iso codes separated by comma, eg. "ger,eng". You can carry over the content for this box directly from the corrsponding field in Atlas Subtitler's Language Preferences.

Solutions for conversion problems

  • If you get an error message please examine the Log output. For example some output file formats allow subtitles streams in them, others not. Try switching off the checkbox 'Try convert subtitles' and/or unselect subtitle streams in the 'Stream Selection' combobox.
  • If you have converted something from H.265 to H.264 and then neither the length nor the picture can be displayed by the player, first press the Format Info button and look at the format of the produced video. If the video stream is of type "high 10" or another number behind it, or if there is something like "yuv420p10le" behind it, the input material is encoded in a 10-bit format. Seems your player doesn't support this (eg. Dreambox or VU+). To have the video generated in 8-bit, switch to the specification tab and enter the text "-pix_fmt yuv420p" in the Input Options field.

  • How to convert between other color depth, either down or up, is described here.

  • If you see only an inferior, pixelated image after a conversion, it is usually because no bitrate was specified in the specification. In this case, each codec selects its own bitrate. Unfortunately, in a few cases this value is much too low. This problem can be solved by entering something between 2000 and 3000 in the Video Bitrate field.


Go to Homepage